GoPro Hero2. Video feedback is very useful to try to figure out what you are doing wrong, and I use a GoPro waterproof camera to do that. I use it in one of two locations. First, I have a mount on my stern deck. This view provides a view toward the bow and shows me and my oars out to the ends. You can see issues with balance and oar height, but you can really see body mechanics all that well. This is also a good mount for races where you want something relatively unobtrusive.
This creates video like this:
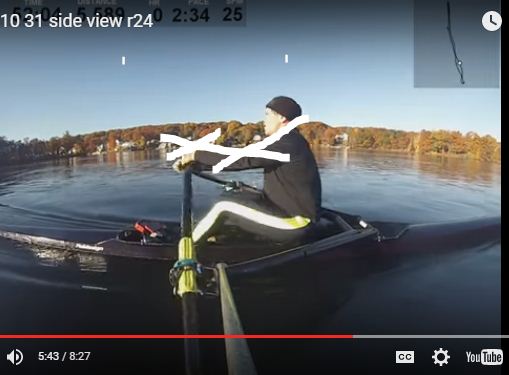
For side view video, I was sent a gift by a friend in Canada. An old backstay. He had previously improvised a mount to put this on the end of his rigger to get the camera about 4 or 5 feet out to the side of the boat.
I modified the way to attach the gopro to the rigger. The end of the rigger is a 1 1/2″ OD aluminum pipe 3 1/2″ long welded to the rigger tube vertically. This tube is drilled on the stern side to mount the oarlock. Looking at it, I decided the easiest way to mount the backstay to the gopro was to put a bolt through the pipe and hold each end with a 1 1/2″ OD fender washer. It worked like a champ!
With this mount, I get videos like this:
Notice the pace, rate and HR? I’ll do another post later about how to do that.
I came across this over on Reddit. I guess Mahe had a GoPro mounted on his boat during the head of the Charles. Basically the same perspective as mine, but mounted a lot further away from the stern so you can’t see the finishes, which I am sure would have been even more impressive.
His row was at the end of the day on Saturday, when the winds had died down a bit from earlier in the day, but was still a factor. The video shows him passing Andrew Campbell between the Western Avenue Bridge and the Weeks Footbridge. Campbell is a lightweight and was effected by the headwind a lot more than the gigantic Drysdale.
Part 1: Including a bit of his warm up, the start and the race through the Anderson Bridge
Part 2: Through the big turn, under the Eliot Street Bridge and to the finish.
Oh, what I’d give to be able to row like that. It is interesting to have a video of the same race, under similar conditions, from the same perspective but with one of the finest scullers in the world doing the rowing. It was particularly humanizing to see him take a lousy stroke now and then.
Sorry about the shaky video. I had to improvise a mount and it had a bit of wiggle to it. I decided that the videos would look better using the youtube stabilization. I’m not entirely sure. Also, for some reason, the heart rate sensor decided to not talk to my iphone yesterday. It worked fine to the speedcoach, but that was using a polar receiver. I suspect that the bluetooth connectivity is a bit squirrely.
Truth be told, it’s not all that exciting a video. I go under a bridge at about 5 minutes into the first part. And the water is nasty and rough, but since I had the first bow number for the event, I had no one to pass. I had a close call with a buoy at 1:55 in the last part. I almost got the last guy of the Master “C” group at the end of the race, but not quite. I think the sprint from 2:00 into that video to the end was pretty good.
The pre-start and about the first 8 minutes or so of the race:
The middle of the race, from after the bridge around the big bend and into the flatter water.
The last few minutes of the race.
Not the prettiest rowing I have ever done, but for the state of the water, I’m OK with it. Lots to work on for next season!
Square at pause: Feather at the finish normally, then pause at half slide, then square the blades, then continue to catch.
Flaws to fix:
Pausing too early. I am pausing at 1/4 slide, right when my hands go over my knees.
Touching water. This is mainly caused by a sloppy finish leaving me slightly off balance
Alternating Strokes: This video starts with a few strokes of slow roll ups, then goes into a 3 stroke alternating sequence. First is a stroke on the square, then a stroke with a slow roll up, then a normal stroke. The idea is to extract the blades the same way for each, and then change what is done on the recovery. I find that the norma strokes feel so good when I do this drill
Yesterday, I did a hard 5k on Lake Quinsigamond. I mounted a gpro camera on a backstay attached the end of to my starboard rigger, just forward of the oarlock.
In the 5K piece, I did the first 2K at r24, the second 2k at r26, and the final 1200 meters at r28.
r24 on fresh legs.
Looking at the video, I am having trouble finding a lot to criticize. The things that I notice are:
More blade clearance off the water
Extract blades a bit more square before feathering
Try to bury the blades a bit sooner. Some strokes, I am missing a little water at the catch.
Sit up a bit taller
The other thing I am wondering is if it would be a good idea to lower my shoes a little bit, I might be able to get a little more reach.
Last thing that I noticed was how absolutely beautiful it was yesterday morning. Isn’t it a pretty lake!
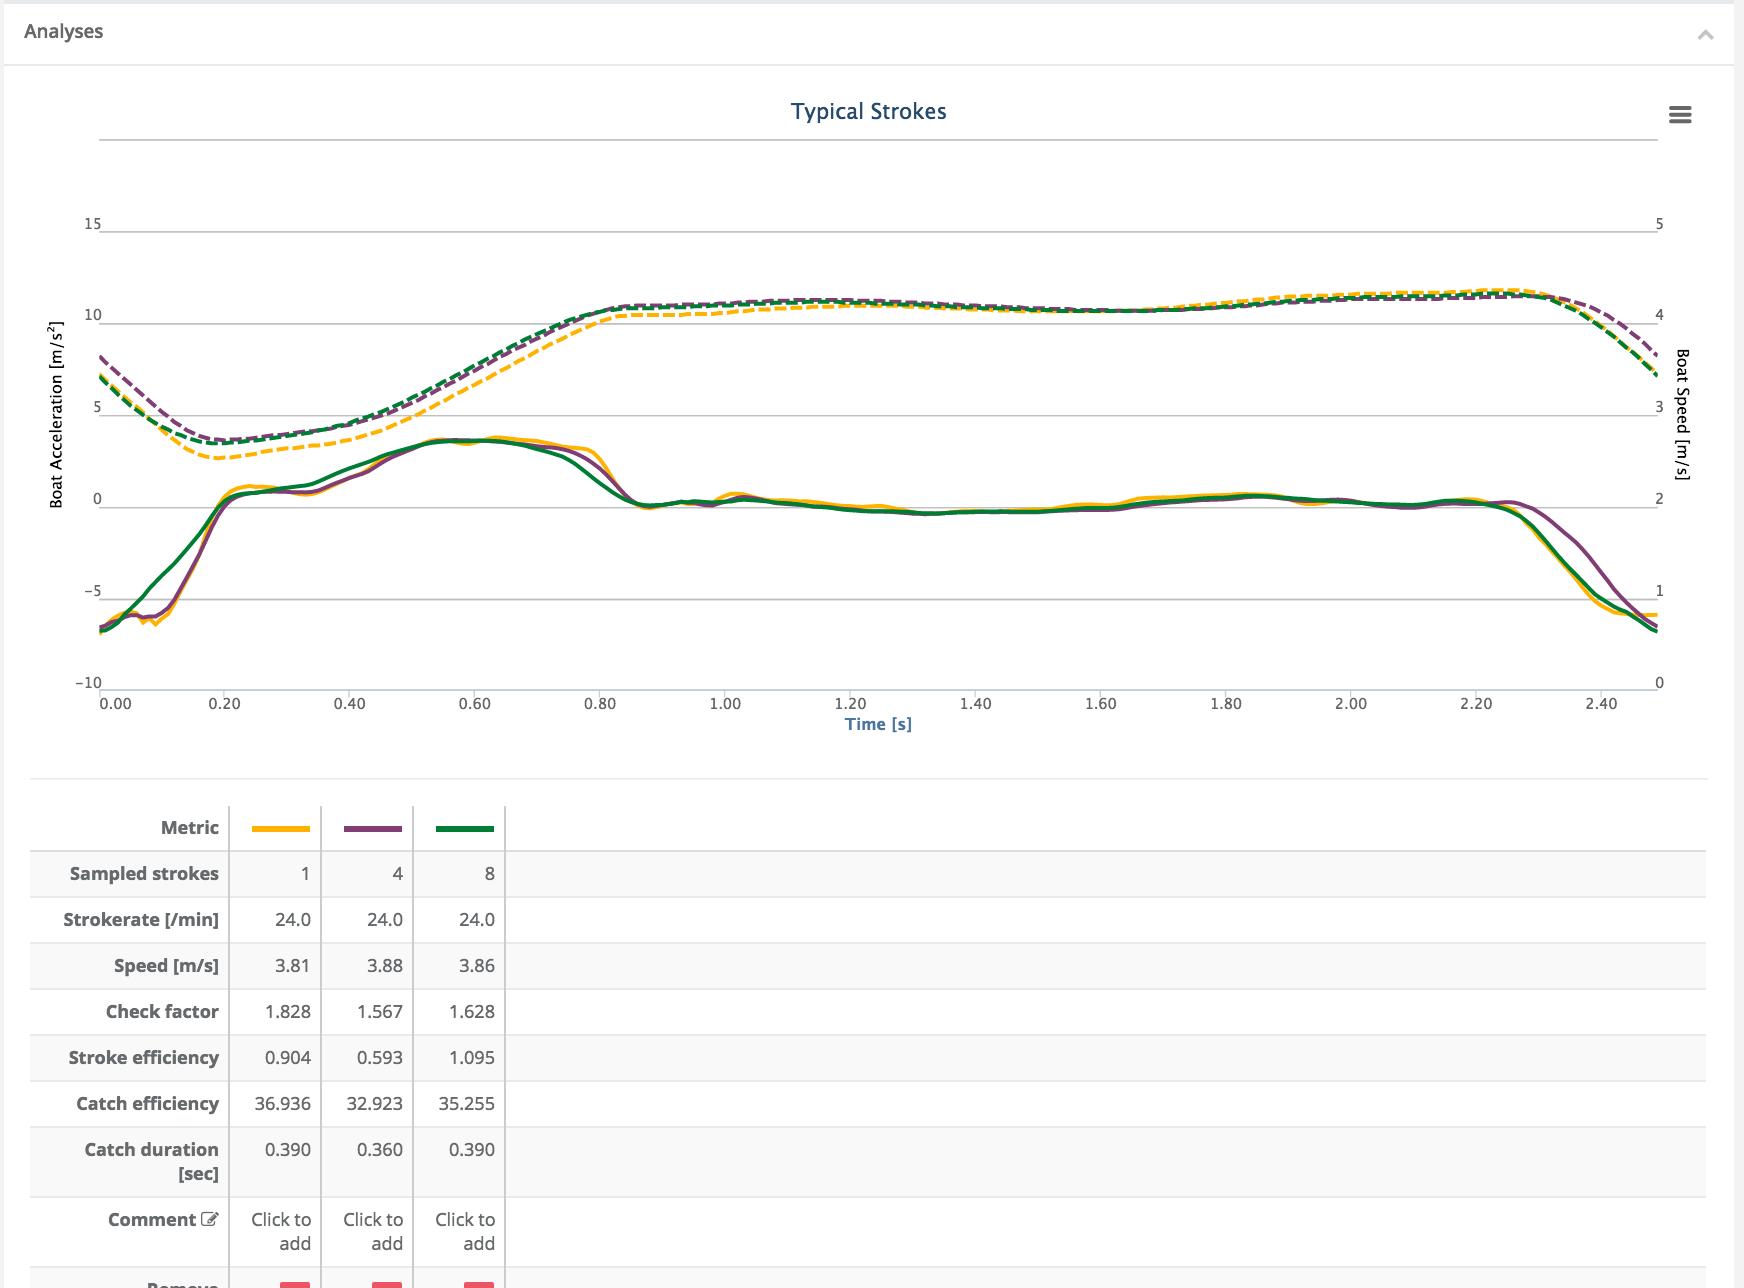
And here is the boat acceleration from RIM.
Comparing this to “world class” curves, the obvious difference is in the height of the positive acceleration peak. There is also a bit of trash at the finish. The catch seems to have a little double hump thing going on, which I have to assume is me bouncing a bit at the forestop.
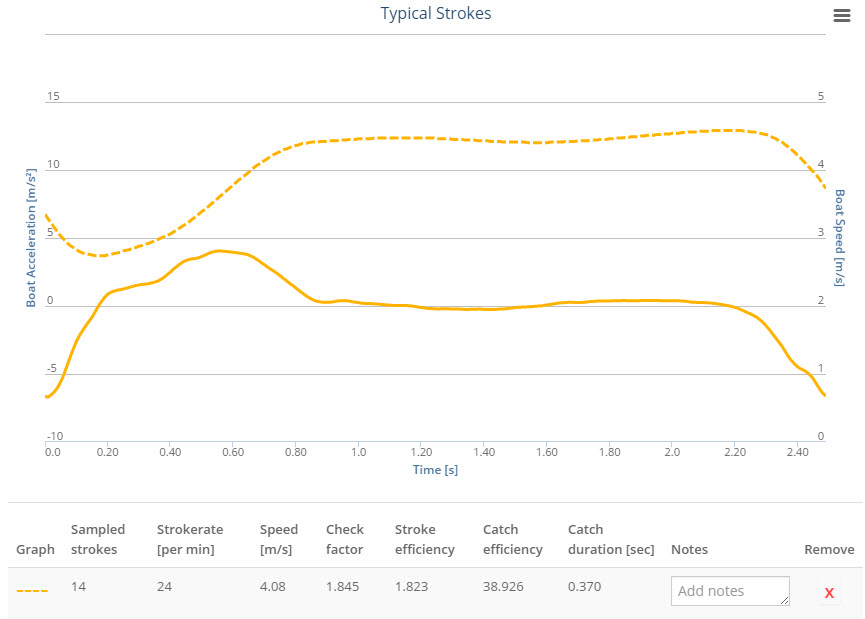
Just to follow up on the discussion from Sander’s blog post. I decided to look at the same set of strokes, but over a single stroke, 4 strokes, and 8 strokes to see how the curves and numbers change.
There is a remarkable change in the curve from 4 strokes to 8 strokes, and the numbers change too. I think that if you are using RIM to provide feedback, that you might do best to either stick to single strokes, or at least make sure that you are always looking at the same number of strokes averaged.
r26 – This was after 2K of hard rowing, so I am feeling a bit more fatigued.
On this one, the primary flaw that I see is that my blades are getting shallower as the drive moves from catch to finish. By the time I extract the blades, about the top 1/3 of the blade is above the surface of the water. I need to work on keeping my hands level through the drive and finish a bit higher on my torso. The other thing that could be causing this is allowing myself to lay back too much at the end of the stroke. I would probably be faster if I finish a bit earlier with less layback.
Here are the RIM curves for r26
The negative acceleration at the catch is larger, which probably means that I am now rushing the slide a bit. You can see a little positive acceleration on the last third of the recovery. Some strokes show a pronounced double hump, some do not. There is still a bit of noise at the finish.
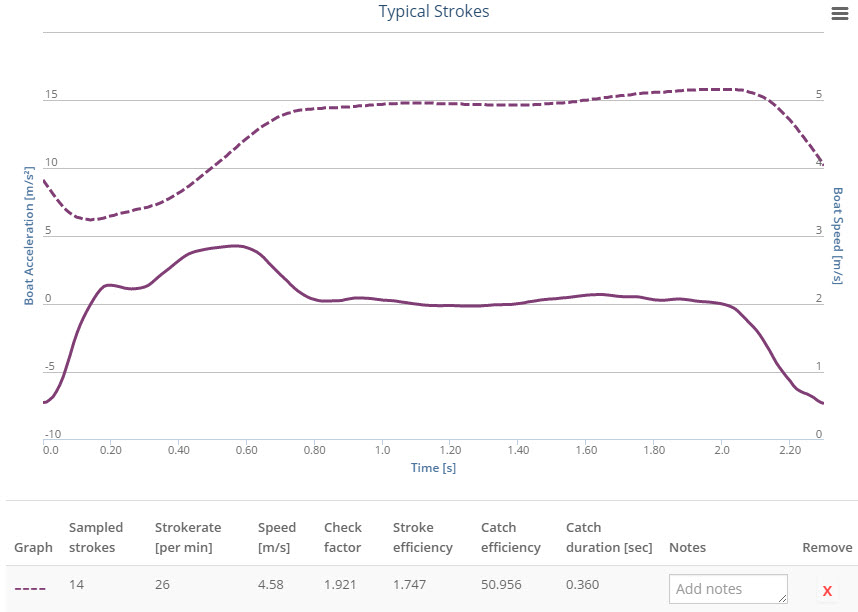
r28
This video is the last 4 minutes of r26 and then about 5 minutes at r28. From 1:30 to about 2:00 into the video, I am going underneath the brand new bridge across our lake. Isn’t it beautiful? Now we have two broad arches, on for up lake traffic and one for down lake traffic.
The r28 stuff starts at about 4:30 into the video.
The stroke mechanics, unsurpisingly look a lot like r26 mechanics. Same basic strengths and weaknesses.
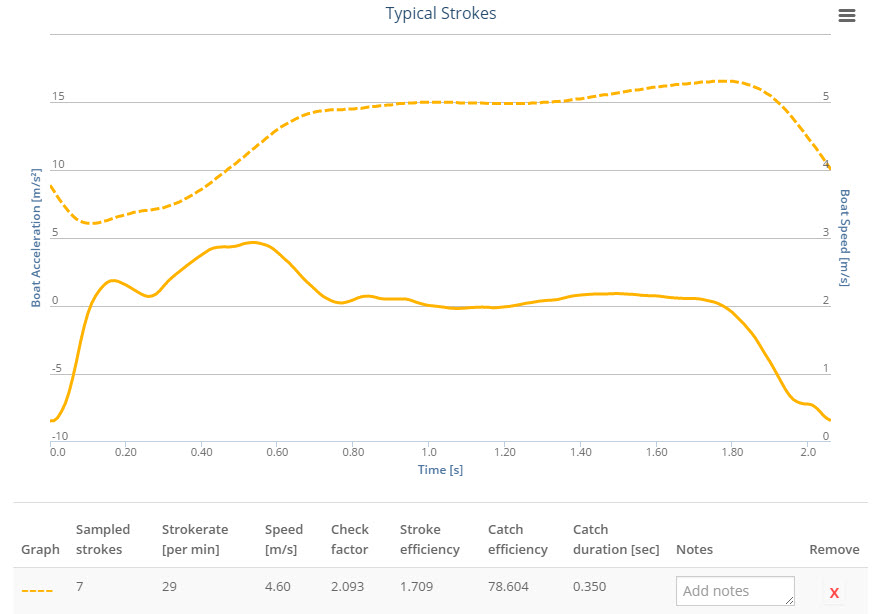
Here is one r28 stroke and one r30 stroke. Basically the same shape. A bit less of the double hump on the r30 stroke. One change this year is that I have a smaller positive acceleration during the recovery, which I think is basically a good thing since it means that my speed on the slide is more constant and I am not rushing into the catch. But I am not expert enough to be sure.
Later today, I will post some video of the drills that I did yesterday. Someone may find them useful, or if nothing else, you can smirk about how bad they look.
I am very fortunate to have had Sander give me some feedback by marking up my video. He was illustrating two flaws in my rowing. The first is not having relaxed and straight arms at the catch.
The other flaw was not maintaining constant handle height through the drive.
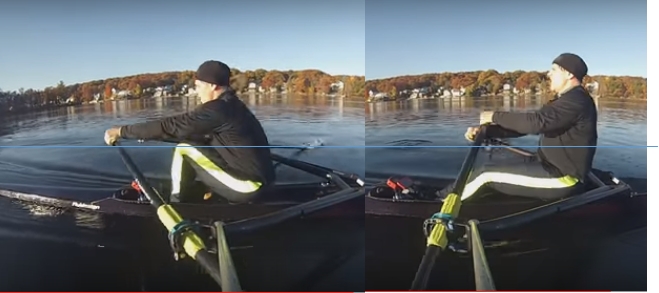
Yesterday, I got a buddy of mine to take video of me as I rowed under a convenient bridge so I could get a better idea of what my catch angle it. Here are the videos
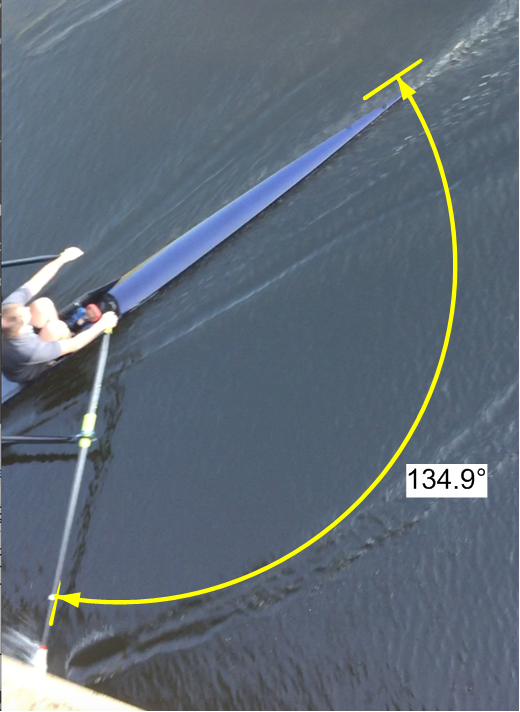
From the second video, I grabbed a frame and drew some angles:
This makes it look like my catch angle is about 45 degrees. I’m not an expert, but references that I have seen say that I should be trying to get to a catch angle closer to 65 degrees. This measurement is not all that accurate, but I think that I should probably do some experimentation with decreasing my span. The only problem is that I have already cranked my oars down as short as they can go and I will need to decrease inboard when I reduce span. (Maybe it’s time to buy some shorter oars?)
I decide to make this a separate post so I can find it a bit easier later.
I did a sequence of 8 – 1 minute pieces with a minute or longer rests between. I was rowing at full pressure in each of them.
Video was recorded by gopro camera mounted on a rigger bow stay that was bolted to the tube at the port end of my rigger. It was about 6 feet from the side of the boat.
The HR, rate, time, pace and distance data, along with the little indicator map are driven by TCX data exported from the RIM website. It is merged into the video using software called Dashware (which is now free and the most amazing way to waste huge amounts of time). As far as I can tell the rate data is accurate to what I see on my speedcoach. The pace looks like it is a bit faster than it was on the speedcoach. I only wish I was that fast.
If you look at the video, just look at that water! It was the most beautiful rowing conditions!
18 spm
Well, I aimed for 18 spm, but I got 19. I was really pretty happy with how this looked. Nice flat plateau during the boat run and recovery. Need to get rid of the hook in thee drive.
20 SPM
22 SPM
Now I’m starting to see a bit of a hump at the end of the recovery. That means that I am rushing into the catch a bit now. The bump in the drive is less, but that is more due to stroke to stroke variation averaging out than an improvement.
24 Spm
You can’t tell from the graphs, but this was the rate that felt the most natural and fluid. The bump late in recovery is getting a bit bigger, though.
The water is so glassy smooth you can see the shoreline perfectly reflected.
26 spm
This is right after my turn and doing the top quarter drill. I’m rested and full of beans!
Notice now that the acceleration down the slide is actually causing the boat speed to increase during the recovery. I have to work on not doing that.
28 SPM
Now the rate is getting high enough that my form, such as it is, is starting to fall apart.
30 SPM
I’m embarrassed to even post this one and the next one. So much rushing to the catch. Such awful drive mechanics. So much work to do.
32 spm
The best thing I can say about this piece is that it started under a bridge, which is fun to look at. It is clear that I need to do a lot of work on the basic mechanics of my stroke, because anything good that was happening at the lower rates has largely disappeared.
And just because I like abuse. Here is my rendition of king of the mountain, and the top quarter drill. It ain’t pretty, but I stayed dry!
So, what do I get from all of this? I compared this to some of the rows that I captured in RIM last season and there are some reasons to be happy. Last season, I was showing that ugly hump in the acceleration curve going into the catch, even at low rates. The metrics also showed a long catch duration and lower peak accleration. Comparing video, I think I look a bit better, but that is more than likely just self delusion.
What’s the prescription to get better. I welcome all ideas, here are mine:
Keep doing the top quarter drill. I feel much more confident at the catch this season and that’s part of the reason why
Keep doing SBR and feet out to work on getting my finishes better
I thought I was not laying back very much, but in fact I am and I don’t think it is helping things. I need to finish with a more erect posture
I need a lot more practice at high rates. I think I will put a few 1′ reps or maybe even 30 second reps at the end of steady state sessions to try to get to the point where I can hold 36 spm reasonably cleanly.
I use a number of hardware and software tools for rowing. I thought I would share what I use, how I use it and how well it works.
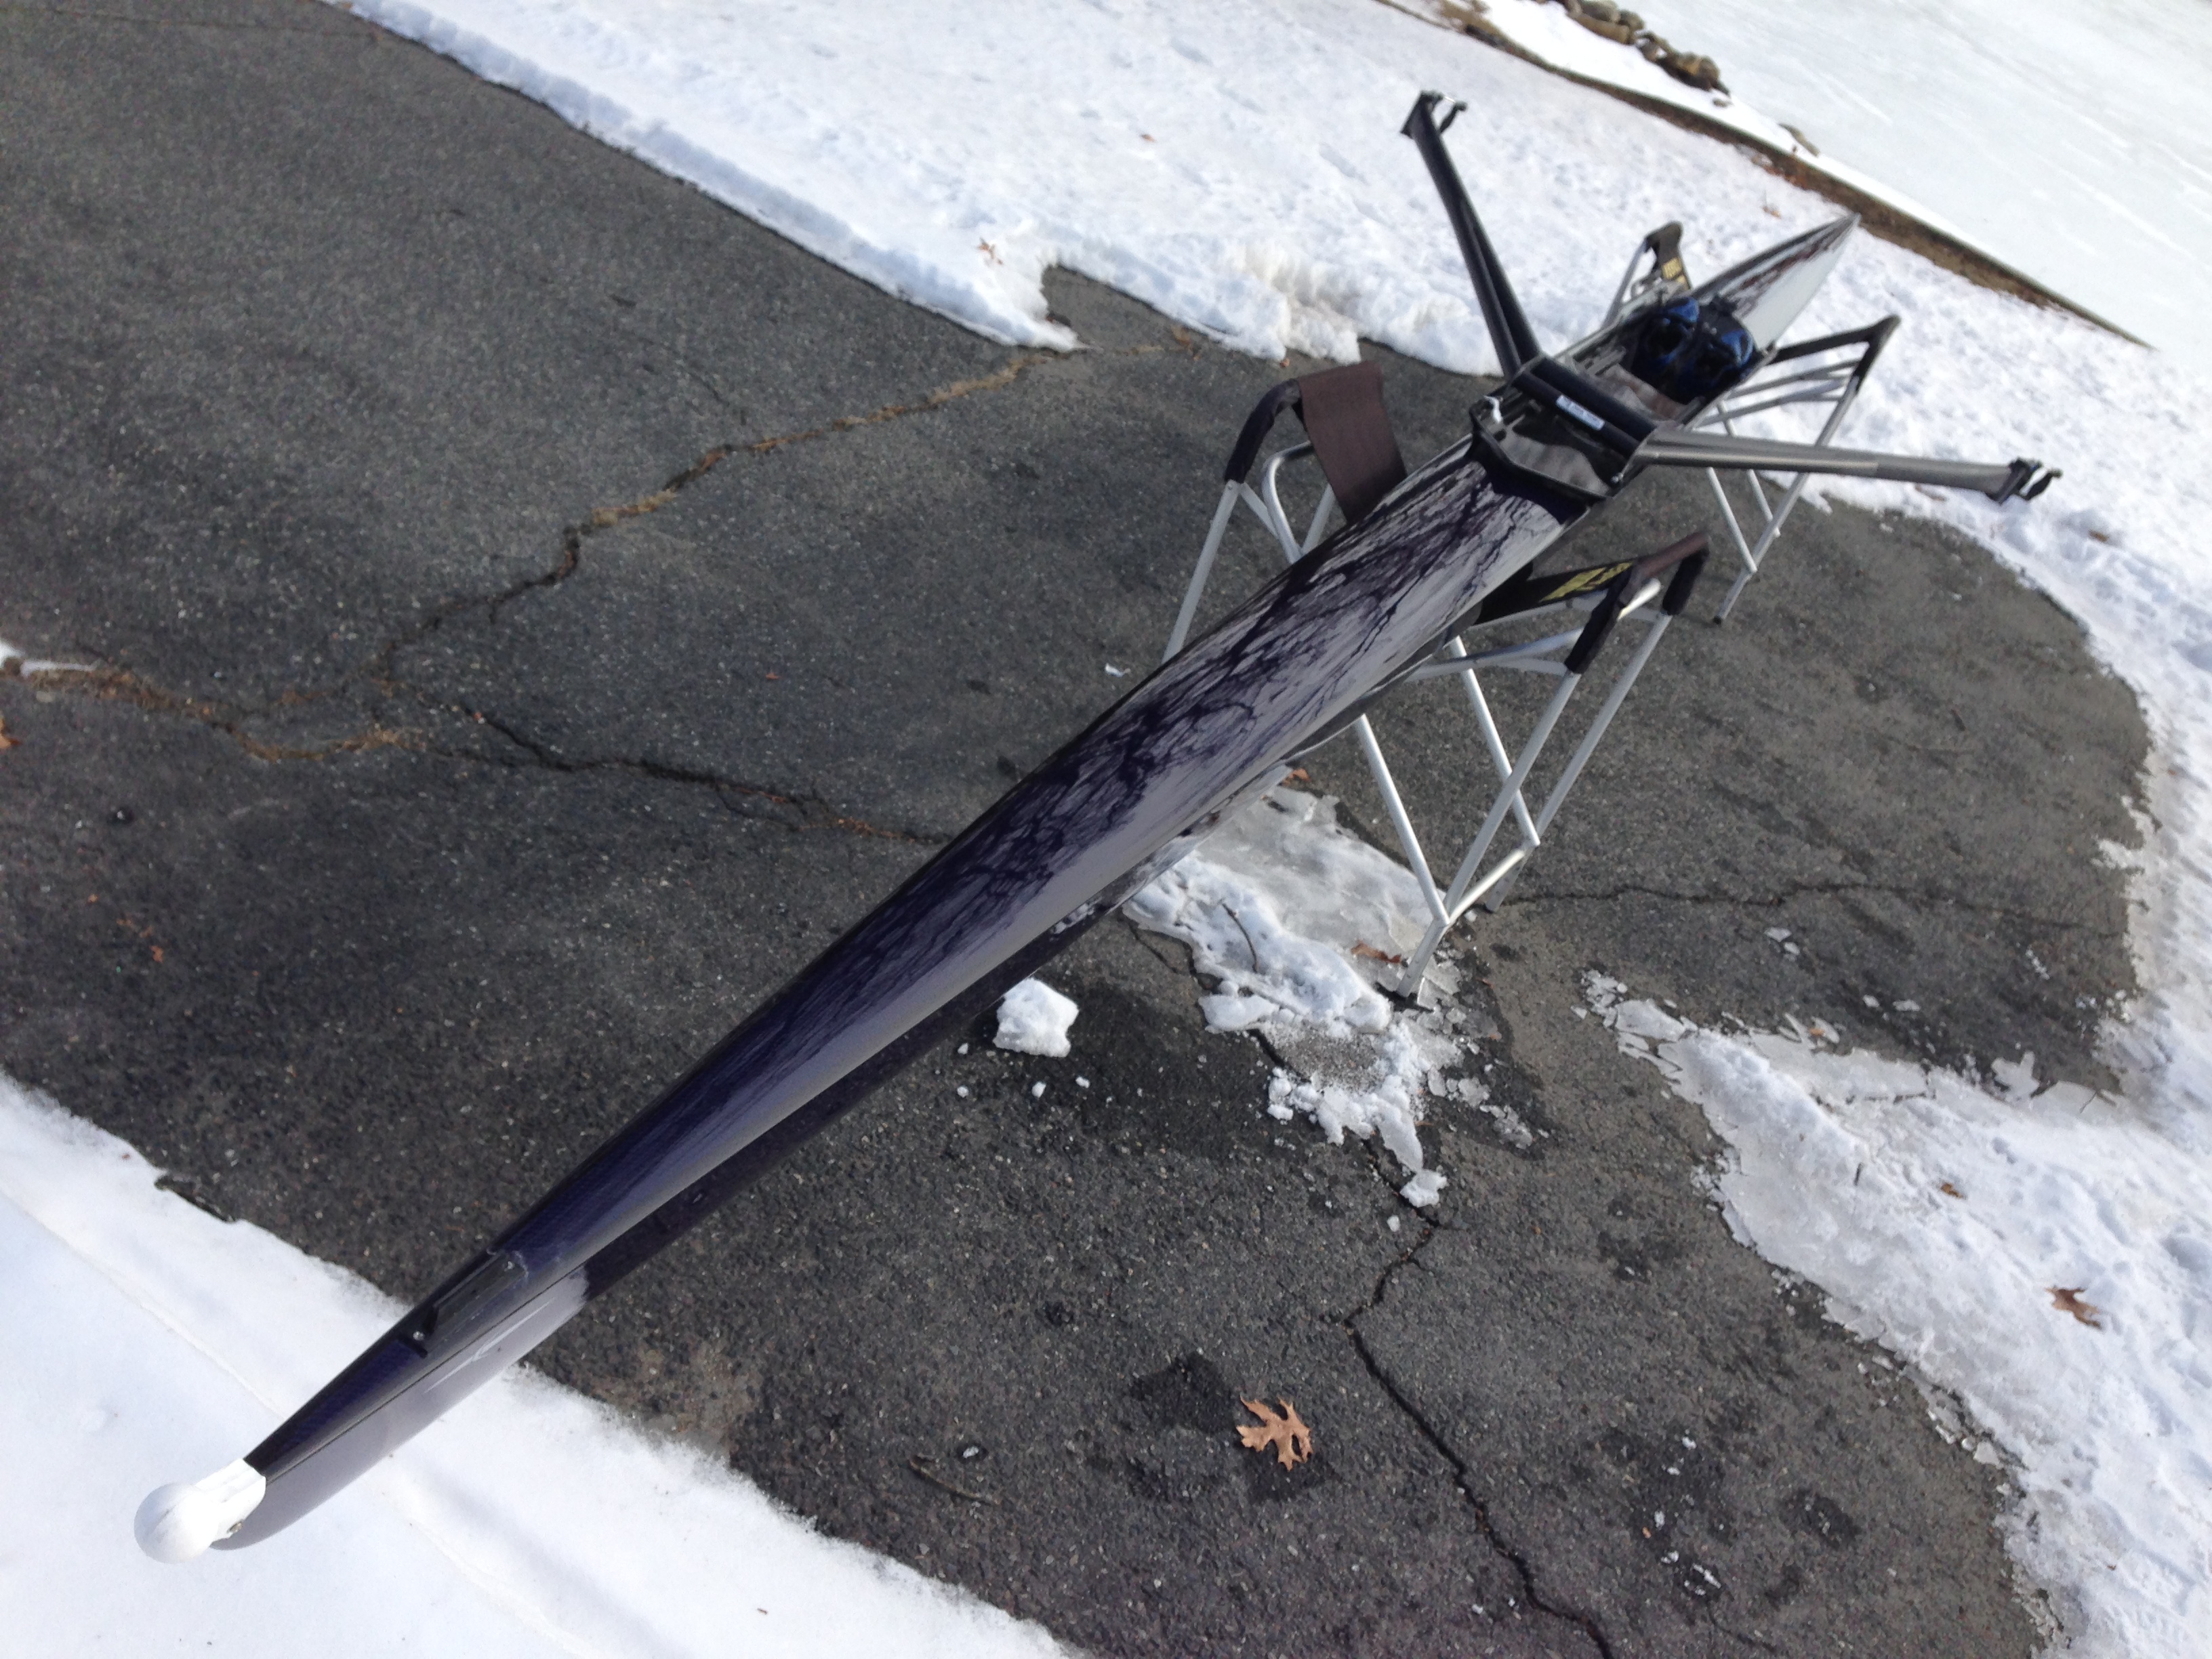
My Boat
2013 Fluidesign EL Intermediate. (Blue Clear coat)
It is a beautiful boat. I upgraded from a 2004 Wintech Competitor and the difference is clear. This boat sets well and I’m very happy with it.
my oars
Concept2 – Fat2 ultralight vortex edge.
Length: 278cm
Span:160cm
Inboard: 89cm
electronics
Speedcoach XL2, which appears to now be discontinued on the NK web site. I picked this unit because I wanted to track HR, along with rate and impeller based speed. It turns out that it has a good deep memory and a tool to enable you to transfer data to excel for analysis. I’m not sure how the new Speedcoach GPS units do for that.
I usually save readings for every 20m. The saved data is transferred to my PC by using the USB connection kit and the speedcoach utility. This utility can export the data as an excel CSV file.
I have an excel workout which produced plots of pace/rate/hr versus distance or time. It also calculates time in each HR training zone, and can be used to pick out intervals from the data.
In addition to the Speedcoach, I always have my iphone in the boat. The stretch of river that I row on can be kind of lonely at times and having a phone is a good idea in case I get in trouble. But since it’s there, it gives me the opportunity to capture more data. For that I have used 2 apps.
CrewNerd. CrewNerd is an iphone app that displays pace, rate, HR, and a bunch of other stuff, You can also program workouts into it and it will save all your workout data. The app is very well done and the display is very clear. The only issue I have had with it is the lag in pace readings caused by the slow (1Hz) GPS update rate of the iphone. You can buy a widget that increases that up to 10Hz, but I think going and buying a Speedcoach GPS would be another way to fix that problem. Anyway, the good thing about using GPS is that you get more accurate readings on still water. On the impeller driven Speedcoach, there is always an accumulating error over long workouts.
Rowing In Motion. I have used Rowing in Motion for at least a dozen outings. It is a very different app from CrewNerd and probably a better app for in the boat. It seems to do a better job tracking changes in speed than CrewNerd, but I’m not sure why. It also provides real time acceleration curves on the display for each stroke. So if you are working on technique, you can use it to see if you are actually improving the way you go through recovery into the catch. It also has a feature called “sonification” which uses the speaker on the phone to emit a tone. The pitch of the tone is related to the instantaneous acceleration of the boat, so you can work on technique without even looking at the display. I never go the hang of using that feature, but it was fun to try.
The data from RIM is typically analyzed in the RIM on line tool, but can also be exported to Excel, although I haven’t done that.
GoPro Hero2. Video feedback is very useful to try to figure out what you are doing wrong, and I use a GoPro waterproof camera to do that. I use it in one of two locations. First, I have a mount on my stern deck. This view provides a view toward the bow and shows me and my oars out to the ends. You can see issues with balance and oar height, but you can really see body mechanics all that well. This is also a good mount for races where you want something relatively unobtrusive.
This creates video like this:
For side view video, I was sent a gift by a friend in Canada. An old backstay. He had previously improvised a mount to put this on the end of his rigger to get the camera about 4 or 5 feet out to the side of the boat.
I modified the way to attach the gopro to the rigger. The end of the rigger is a 1 1/2″ OD aluminum pipe 3 1/2″ long welded to the rigger tube vertically. This tube is drilled on the stern side to mount the oarlock. Looking at it, I decided the easiest way to mount the backstay to the gopro was to put a bolt through the pipe and hold each end with a 1 1/2″ OD fender washer. It worked like a champ!
With this mount, I get videos like this:
Notice the pace, rate and HR? I’ll do another post later about how to do that.
Today was the first time I have erged without slides since trying to implement the changes to my stroke. It wasn’t a stellar session, but I thought it would be instructive to see how things compare between static and slides.
I did a rate ladder with 1 minute at r18, 1 minute at r20 and 1 minute at r22.
My feet were not strapped in and the erg is equipped with a core-perform seat which I had set to wobble to force myself to maintain upper body balance.
Looking at the film, I can see that I am struggling with the new stroke. I am trying to maintain a good upright posture, but tend to slump at the finish. I am also not completing the body swing before I break my knees. The stroke looks better at r22, but the sequencing is still wrong.
I may have to resort to some pause at body over drills to try to get the new positioning right.