Friday: 8K steady state in the Miracle Shell

Weather:  Broken clouds, occasional drizzle, windy.  WSW 5-10 mph with higher gusts.

Back in the saddle!  While I was in Phoenix, the good people from Fluidesign dropped off my boat.  I am massively impressed with the results.

Here’s the before picture:

2016-04-08 17.40.10

And here are the after pictures:

The finish is beautiful, and there are only the the slightest hint of a ripple where the carbon had been creased and torn.

On the water, the boat felt just like before.  Stiff and responsive.  It set well and had been rerigged perfectly.  It tracked perfectly.  I am amazed at the repair.

By the time I had gotten it all unpacked and all the gadgets mounted, I was short on time, so I did a quick 8K steady session.  I wanted to take it easy and make sure that I felt confident in the boat before I did anything too intense.  I loved being back in my boat!  For the same effort, I feel like I am about 5 seconds faster on pace.  A little tough to tell because of the breeze this morning, but the speedcoach seemed much more willing to spend time below 2:30 pace than in the peinert.

myimage (10)

Of course there are a few nits that I need to take care of on the boat.

  1.  They reset the fin when they repainted the boat.  In doing that they did not notice the damage behind the fin from a close encounter with the sunken log (Trees and this boat do not get along!)  During my row, I shipped a little water in the stern.  I just need a dab of silicon over the area and it will be fine.
  2. When they refinished the boat, they forgot to remount my impeller.  I didn;t even notice this until I was rowing and saw the pace display on the speedcoach stubbornly staying blank.  I felt under the boat to see if the impeller was fouled with weeds and discovered that it wasn’t there!  I’ve asked them to send it back to me so I can get it put back on.
  3. I noticed that an elastic bands on one of the Magik oarlocks had snapped.  This band opens the oarlock when the latch is disengaged, so it is not critical, but I’d like to fix it.

All minor, and easily fixed.

Tomorrow:  Out to Worcester.  Time for a bit  more intensity.  I’m thinking of doing a  4 x (6 x 1′ on / 1′ off) 4′ rest at r30.

My new boat, an Alden Star

Previously owned by the Marblehead Rowing Club. I was impressed with the club.  They are set up in a corner of a big warehouse type building in a boatyard on Marblehead’s little harbor.

map

I was shown to the boat which was on the clubs immaculate racks.  There was a group of folks who had just rowed over the Manchester and back (that’s 11 miles round trip!) enjoying some coffee and scones.  The boat looked really nice.  Someone had cleaned it up nicely.  We took it out to the dock and the guy from the club who was selling the boat (and my Dad, who lives in Marblehead) got in a launch to follow me and make sure I didn’t die.

The boat seemed familiar and unfamiliar all at the same time.  It’s a lot wider, so it has a lot more intrinsic stability.  It is only 22′ long, so it has less directional stability.  I was expecting it to feel much heavier to row, but it did not.  In fact it felt quite responsive.

The cockpit is shallow, so that it will not get weighed down with water that inevitably gets into it.  There is an automatic bailer that will pull water out of the cockpit if you are rowing.  It has clogs instead of shoes.  These were very secure and comfortable in use.  On the stern deck is a reverse reading compass.  Even with coastal rowing, it is often very hard to get a point to steer from, and the compass is handy to keep a good line.

The riggers are a simple aluminum tube and can be removed by unscrewing 4 hex screws.  I’ve been warned that the rigger hasn’t been off in years and these screws might be tough to remove.  We’ll see if I ever need to get them off.  The oarlocks are standard issue concept2, set on pins that project up from the rigger, so the oarlocks can rotate 360 degrees around the pin.  There are two access ports.  The one on the seat deck has a gear bag inside it and a tow line in the bag.  The bow one does not.  There is shock cord tie downs to hold a PFD just toward the bow from the rower.

A close inspection of the hull and deck showed no significant scratches.  When held at the ends, there is a bit more flex in this boat than in a carbon fiber single, but I would expect that since there is more weight, the weight is in the middle and it’s fiberglass.  I didn’t notice any flexure when rowing.

I headed out of the harbor and into the confuse chop.  There was about a 1 foot swell, plus wakes from a whole bunch of motorboats buzzing around.  Coming out of the harbor, I was going up into it, and I started to get a feel for adjusting my timing to match the wave frequency.  I was a bit nervous about rowing across the waves, but the motion was not that bad and the boat was very stable when rowed.  I stopped and let the launch catch up with me and we noticed that the light mist had become a reasonably thick fog, so I decided to cut it short and loop back in behind the island.  I pushed up the pace and rate for the last 500 meters or so to see how the boat felt, and to put a bit more stress on the riggers and oarlocks.  The boat felt solid, and the riggers and oarlocks were stiff and smooth.  I was smitten.  Rowing on open water is a different experience.  The waves were quite small and I still managed to ship a fair amount of water in the cockpit from waves breaking over the bow.  I set the foot stretcher by eye and it turned out to be just about right.  I was very comfortable the way it was rigged.

On taking the boat out of the water, we noticed that it had taken on a little water, maybe a cup or so.  I suspect that there is a leak somewhere, perhaps around the bailer, or one of the ports.  I will give it a close inspection and recaulk the most obvious seams.

After I got the boat loaded, the guy selling me the boat gave me a scone and water and started telling me about the club.  They seem to have a lot of fun.  They send a group up to compete in the Blackburn Challenge every year.  This race is on my Rowing Bucket List.  This is a race that circumnavigates Cape Ann.  It is over 20 miles long and usually provides a pretty wild set of conditions.

Screen Shot 2016-06-05 at 7.11.30 PM.png

It starts in gloucester, around the place labeled Babson Ledge.  It then proceeds up the annisquam river to the north mouth of the river, then east along cape ann, then turns south, going past Rockport harbor, and then finally turning back south west for the leg back to gloucester harbor.  If there is a South East wind, there tends to be pretty big swells along the Southwest leg of the race.

Last year it was a bit windy, and the wind was from the North.  When the races were coming out of the north mouth of the river, the tide was ebbing, so there was a wind blowing over the outgoing tide, building some big waves.

Screen Shot 2016-06-05 at 7.18.36 PM.png

Anyway, the guy who sold me the boat invite me up to join them for a practice or two, and to come with them to the race.  It’s July 16 this year, which is a bit too soon for me to feel comfortable, but I think I’m going to plan and train for it for next year.  It would basically be marathon training because it takes between 3.5 and 4.5 depending on conditions.  I think it would be a blast!


Fluidesign: Battered, but unbowed

I went and removed the tree from my poor boat.  Then I gently removed the cover.  I tried to massage it back into a boat like shape.  With a loud pop, it started to look like a boat again.

A ton of damage, but at least it looks like a boat.  Remarkable resilience really.


The before picture

2016-04-08 17.40.10The after pictures

So, the fine folks from Fluidesign will be picking it up on April 20th and taking a shot at repairing it.  If they succeed, I now have a great boat name “Phoenix”, or maybe the french version “Fenix”.


That will leave a mark.

I went to pick up my boat Friday evening to go rowing out in Worcester and I was greeted by this site.

2016-04-08 17.40.10

Yup, that’s a really big tree branch that has destroyed the bow of my boat.  We had a very windy and rainy day on Thursday, I assume the branch came down then and no one noticed during the day Friday.  I won’t be rowing that boat any time soon.  With all my talk about grit and resilience…this was a huge blow.  I cried when I saw it.

Now I get to have many conversations with insurance agents and see what happens.


Comparison of ErgStick and ErgData

This is not meant to be a comprehensive product review.  Instead it is an evaluation of two products to figure out which one is the best for my specific needs.

Those needs are:

  • Record stroke by stroke data from the erg
  • Support PM5 (required), PM4 and PM3 (bonus)
  • Works with iphone
  • No physical connection required to phone (because I use headphones and wear the phone on my bet when I row * )
  • Works with other apps running including wahoo fitness, stitcher, spotify, etc
  • Works with wahoo tikr HR strap
  • provides CSV output for post processing (required)

* Note:  Before you ask, I have tried wireless ear buds and none of them stay in my ears, and all of them are incredibly fiddly.  Maybe someday cheap, reliable BT earbuds will be available that I can screw securely into my ears.  Until then, the phone stays on the hip.

I was going to originally include PainSled in the evaluation, but I am still working through some Beta issues with the developer.  As soon as I have something useful to say, I’ll write that one up too.

First up.  Ergstick.  Check out their website.  It is a USB dongle that is sold for $120.  This is what it looks like.

2016-03-05 21.46.22.jpg

You jam the green thingy into the back of your PM5, or the bottom of your PM3.  I haven’t  tried it with the PM3, but I plan to tomorrow.

Then you fire up the app and I made a horrifying discovery.  To get the single most important feature that I wanted from the software (CSV exports), I needed to pony up for “ErgStick Pro” to the tune of $39.99.  And this did not buy the pro version, it gives a one year subscription to the pro version.  So the cost of ergstick is $120+$40 initially, plus $40 per year.  Wow! Ouch!  On top of that, I can find nothing about this on their website.  The only place where it is defined is in the description of the app in the apple app store.

Screen Shot 2016-03-05 at 9.55.12 PM.png

OK, well I’ve come this far.  Next step is to try it out.  I paid my money (in for a penny, in for a pound) and upgraded.  The app synched right away with the dongle and provided a live screen with nifty data that I don’t look at.

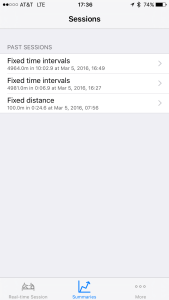
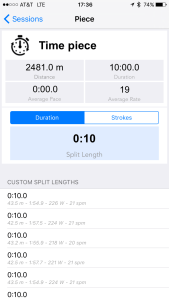
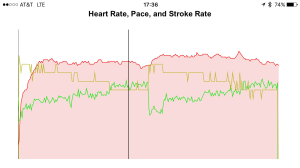
I programmed the PM5 for a time interval session (10′ with 0:00 rest), and off I went.  When I finished, I pushed menu to terminate the workout and checked out my phone.  Here are the cool screen you get.

Pretty nice displays.  On the Heart Rate, Pace and Stroke Rate screen, the cursor should have been showing the values.  For some reason it didn’t in the interval session.  It did for this simple 100m test session that I did without a HR sensor.

2016-03-05 17.37.23

Getting CSV was not as convenient as some other apps, which allow you to ship to dropbox or sync multiple files automatically.  In this app you need to email each file individually.  A pain, but workable.  From there it was simple to modify my ergdata spreadsheet to deal with the ergstick format data.

Screen Shot 2016-03-05 at 5.47.57 PMScreen Shot 2016-03-05 at 6.05.03 PM

ergstick provides 4 to 6 records per stroke, and a huge number of data fields in the CSV.

Total elapsed time (s)

Total distance (m)

Stroke rate (/min)

Speed (m/s)

Current heart rate (bpm)

Stroke count

Stroke power (W)

Stroke calories (cal/hr)

Projected work time (s)

Projected work distance (m)

Split/interval time (s)

Split/interval distance (m)

Split/interval rest time (s)

Split/interval rest distance (s)

Split/interval type

Split/interval number

Split/interval ave. stroke rate (/min)

Split/interval ave. pace (/500m)

Split/interval total calories (cals)

Split/interval average calories (cal/hr)

Split/interval speed (m/s)

Split/interval power (W)

Split/interval ave. drag factor

OK, so on to ergdata.  With the PM5, it’s just the same except it doesn’t cost anything. I started ergdata on my phone, and it immediately synched up with the PM5.  I programmed the same 10’/0 rest interval session on the PM5 and did another L4 steady state session.

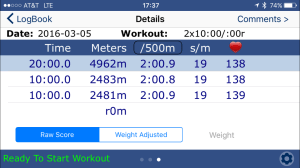
After I finished, I pressed menu on the PM5 to terminate the session and checked my phone.  Here are the key screens.

On the logBook screen you can push the sync button and like magic, the session appears in your concept2 online logbook.

Screen Shot 2016-03-05 at 10.11.38 PM.png

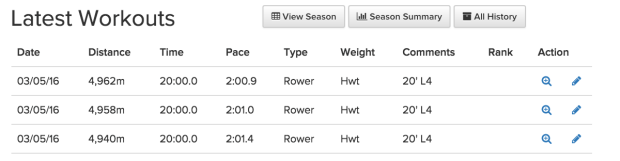
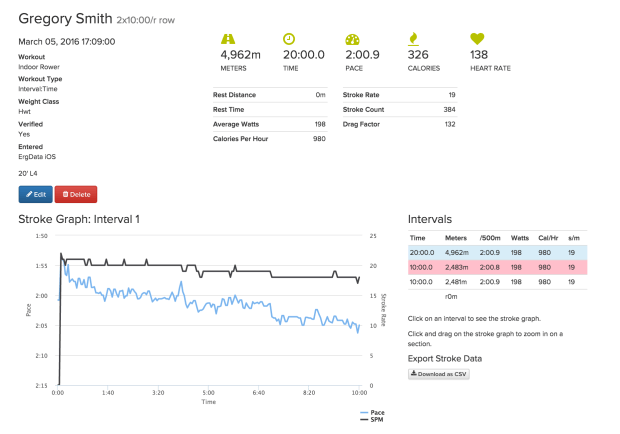
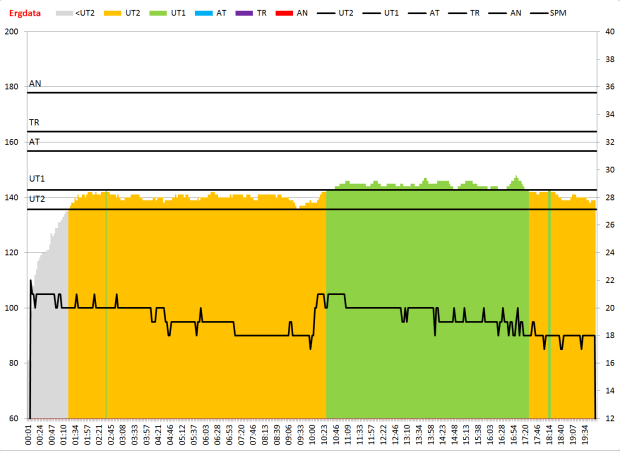
Then you can push the little magnifying glass to dive into the workout.  And then this is what you see.  I’ve heard through the grapevine that HR data will be added to the graphs and summaries soon.  The graphs show the selected interval.  There is no choice of units or ability to show the whole workout.  There are apparently some glitches in the way that it calculates pace for interval workouts with rest meters in them.  I assume for ranking distances that they have tested the crap out of it, but if you should check the numbers if you care a lot.

Screen Shot 2016-03-05 at 10.12.28 PM.png

You can see over on the right side, at the bottom there is an option to export stroke data.  This is a much less sophisticated data set than ergstick, but it has all the basics with a single record per stroke.

Stroke Number

Time (seconds)

Distance (meters)

Pace (seconds per 500m)

Stroke Rate

Heart Rate

This was easy to massage into excel.  So easy in fact, that I decided to add a watts graph to the collection.

Screen Shot 2016-03-05 at 6.05.03 PMScreen Shot 2016-03-05 at 6.05.22 PM

So, from my perspective, there is a clear winner.  Ergdata is much, much cheaper, and it provides automatic synching with the concept2 log book.  If you have a PM3 or PM4 and you are thinking of buying an ergstick, I suggest a PM5 upgrade instead because the cost will less after the second year.

There is a specific group of people that I think will prefer the ergstick.  If you are on a team or have a common practice facility with a large number of ergs that have PM4 or PM3 and you want to get workout data in a consistent format, then ergstick will be a very good solution.   It will let you use any erg and get the data you need.  But it is pretty darn expensive.


Boat repair

On Wednesday night, I stopped at the hardware store and bought epoxy, silicone caulking, and the tools I needed to do my fin repair.

On Thursday morning, I stopped and picked up my boat and threw it on my car roof.  At lunch on Thursday, the weather was nice, it was warm enough to use the epoxy and silicone, so I put my boat on slings in the parking lot and set to work.

Job one was to extract the fin without doing any more damage to the boat.  So, I sliced the existing caulking on both sides, and front and back and then slowly worked the fin out of the fin box.  Then it was on to caulking removal.  I was able to get all the caulking off the fin and most of the caulk off of the outer surface of the hull.  I was able to cut the caulking away from the top of the fin box where the seam was between it and the hull of the boat.  I cleaned this up with the knife as much as I could and I could see where the seam was delaminated on both side from about half way back to the stern.

I mixed up some epoxy and delicately smushed it into the crack all the way around trying to avoid getting any drips down the sides of box.  Then I waited about 10 minutes for the epoxy to setup and stop being tacky.  The last thing I wanted was to permanently glue the fin in with epoxy.  That would be bad.  While I waited, I put down masking tape on the hull marking the outside line of where I wanted caulk.  I did the same thing on the fin.

Once it was dry to the touch, I carefully reset the fin in the box.  It appeared that the box stayed laminated all the way around during this process and the fin appeared to my eye to be aligned and in the same position as before.  At that point, I put down a big bead of caulking along both sides, trying to make sure that all voids were completely filled.  I then took a caulk bead tool and used it to form a small 45 degree fillet between the hull and the fin along both sides.  I carefully faired the caulking at the front and back to make sure that it was completely filled and smooth.  Then I pulled away the tape.  It actually looked pretty good for an amateur job.

I left the boat as it was for the afternoon, and when I left for the night, the fin was stable in the slot.  I suspect that it is not entirely perfect, but this morning when I used the boat, it tracked straight and didn’t leak, so I think it’s good for the rest of the season. I might get a pro to look at it this winter.

New toy – cheap road bike

Asset_216835

I decided that I wanted a cheap road bike.  I have a 20 year old mountain bike which I ride every once in a while, mostly when we are on vacation or I’m really desperate for some cross training and it is not well suited for the purpose.  It is heavy, slow, has knobby tires and the straight bar handle bar makes my hands go numb within about 5 minutes of riding.  So, I bought an entry level Trek.  I asked for advice and looked around a bit on the internet, but ultimately decided to just buy from my local bike shop (Landry’s Cycles)  I’ve been going there for years to buy bikes for my kids and for repairs and I’d like to make sure that they stay in business, so I decided to pick from the brands that they had (Trek and Specialized).  I wanted to keep the price down below $800, so there wasn’t a lot of choice.  Ultimately I picked the Trek 1.2 because it got me one step up the ladder on the derailleur (Shimano Sora), still not high quality, but enough to get me on the road.

I got it home and decided to take it for a quick spin.  It turned out to be about 18km in just under 40 minutes.  I am surprised how much more pleasant it is to ride a road bike than a mountain bike.

Screen Shot 2015-06-14 at 7.25.55 PM

It was a nice little workout.  Basically a 40 minute aerobic session with one good hill in the middle.  Avg. Speed was 28km/h.  I had 108m of climbs.

Screen Shot 2015-06-14 at 7.11.37 PM

I enjoyed that.  I think it might be a good way to add some aerobic minutes.

CrewNerd and XGPS160 – Initial impressions

When I row, I generally have both my iphone running CrewNerd and a Speedcoach XL2 in the boat.  I bring the phone because it is a reasonably lonely stretch of river and it is a recommended safety accessory.  Since I need to have it in the boat, I might as well have it do something useful.

I have used both CrewNerd and Rowing In Motion and there are pros and cons of both.  RIM is a great tool for real time feedback in the boat.  CrewNerd has better data export features and good tools to review a workout on the phone including a map view and nifty graphs of pace, rate, HR and stuff.

The major disadvantage of using CrewNerd versus the Speedcoach XL2 is the accuracy, stability and responsiveness of the pace readings.  CrewNerd works off of the GPS in the iphone.  This provides position data on a 1Hz basis, and the application uses this position data to deduce the velocity.  By comparison, the Speedcoach GPS2 has a GPS capability that provides 5 updates per second.  The impact of this is that Crewnerd needs to use significant smoothing to stabilize the coarse position data.  This causes a significant lag, up to 10 seconds between a velocity change in the boat and the pace display on CrewNerd showing a stable, accurate pace.  You can crank the smoothing dow, but then you end up with pace readings that essentially oscillate around the actual pace.

The good folks who developed CrewNerd recommend that the best way to get more accurate and responsive pace display is to pair the iphone with an external GPS receiver.  They recommend the Dual XGS160.  This provides 10Hz position data.  When paired with this receiver, the pace display responds quickly and settles well.

However, CrewNerd seems to be unreliable with the XGPS160 receiver.  Sander (of “Rows-And-All” fame) has previously described having hangups and the freezing of the CrewNerd navigation display when using the receiver.  This morning the same thing happened to me.  I was 11K into a 14K row, and then the pace and distance displays stopped updating.  The HR display was alive and displayed an accurate number.  I’m not sure what’s going on, but I am not sure whether it is better to have a laggy pace display or have the app stop functioning in the middle of a practice or race.

My Toys for Rowing on Water

I use a number of hardware and software tools for rowing.  I thought I would share what I use, how I use it and how well it works.

My Boat

2013 Fluidesign EL Intermediate. (Blue Clear coat)

2014-03-01 10.14.16It is a beautiful boat.  I upgraded from a 2004 Wintech Competitor and the difference is clear.  This boat sets well and I’m very happy with it.

my oars

Concept2 – Fat2 ultralight vortex edge.

  • Length: 278cm
  • Span:160cm
  • Inboard: 89cm

electronics

Speedcoach XL2, which appears to now be discontinued on the NK web site.  I picked this unit because I wanted to track HR, along with rate and impeller based speed.  It turns out that it has a good deep memory and a tool to enable you to transfer data to excel for analysis.  I’m not sure how the new Speedcoach GPS units do for that.

I usually save readings for every 20m.  The saved data is transferred to my PC by using the USB connection kit and the speedcoach utility.  This utility can export the data as an excel CSV file.

I have an excel workout which produced plots of pace/rate/hr versus distance or time.  It also calculates time in each HR training zone, and can be used to pick out intervals from the data.

In addition to the Speedcoach, I always have my iphone in the boat.  The stretch of river that I row on can be kind of lonely at times and having a phone is a good idea in case I get in trouble.  But since it’s there, it gives me the opportunity to capture more data.  For that I have used 2 apps.

CrewNerd.  CrewNerd is an iphone app that displays pace, rate, HR, and a bunch of other stuff,  You can also program workouts into it and it will save all your workout data.  The app is very well done and the display is very clear.  The only issue I have had with it is the lag in pace readings caused by the slow (1Hz) GPS update rate of the iphone.  You can buy a widget that increases that up to 10Hz, but I think going and buying a Speedcoach GPS would be another way to fix that problem.  Anyway, the good thing about using GPS is that you get more accurate readings on still water.  On the impeller driven Speedcoach, there is always an accumulating error over long workouts.

Rowing In Motion.  I have used Rowing in Motion for at least a dozen outings.  It is a very different app from CrewNerd and probably a better app for in the boat.  It seems to do a better job tracking changes in speed than CrewNerd, but I’m not sure why.  It also provides real time acceleration curves on the display for each stroke.  So if you are working on technique, you can use it to see if you are actually improving the way you go through recovery into the catch.  It also has a feature called “sonification” which uses the speaker on the phone to emit a tone.  The pitch of the tone is related to the instantaneous acceleration of the boat, so you can work on technique without even looking at the display.  I never go the hang of using that feature, but it was fun to try.

The data from RIM is typically analyzed in the RIM on line tool, but can also be exported to Excel, although I haven’t done that.

GoPro Hero2.  Video feedback is very useful to try to figure out what you are doing wrong, and I use a GoPro waterproof camera to do that.  I use it in one of two locations.  First, I have a mount on my stern deck.  This view provides a view toward the bow and shows me and my oars out to the ends.  You can see issues with balance and oar height, but you can really see body mechanics all that well.  This is also a good mount for races where you want something relatively unobtrusive.

2013-09-18 06.37.38

This creates video like this:

For side view video, I was sent a gift by a friend in Canada.  An old backstay.  He had previously improvised a mount to put this on the end of his rigger to get the camera about 4 or 5 feet out to the side of the boat.

I modified the way to attach the gopro to the rigger. The end of the rigger is a 1 1/2″ OD aluminum pipe 3 1/2″ long welded to the rigger tube vertically. This tube is drilled on the stern side to mount the oarlock. Looking at it, I decided the easiest way to mount the backstay to the gopro was to put a bolt through the pipe and hold each end with a 1 1/2″ OD fender washer. It worked like a champ!

With this mount, I get videos like this:

Notice the pace, rate and HR?  I’ll do another post later about how to do that.